
OverDrive Training How-To: Assigning Titles to Your Students
1) Log into OverDrive Marketplace.
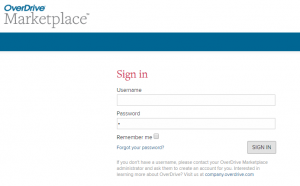
Don’t have a login? Reach out to your OverDrive Account Manager or asksora@overdrive.com and ensure you have “Title assignments” admin privileges.
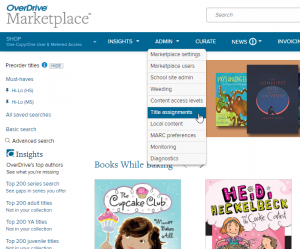
2) Click Admin on the main blue navigation bar and choose “Title assignments” from the drop-down menu.
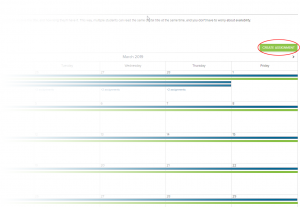
3) Click the green CREATE ASSIGNMENT button on the middle right side of your screen.
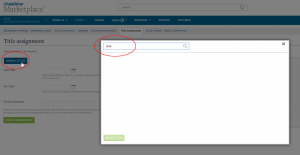
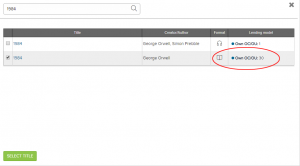
4) Click the blue SEARCH TITLES button to begin looking for the title you’d like to assign.
Reminder: this search is looking through titles you already own at your school, not performing a Marketplace search for new titles to purchase.
5) Check the number of copies you own of a title to ensure you can meet the needs of your students.
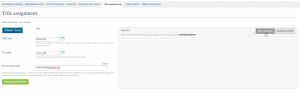
6) Add your start and end dates for the Title assignment.
Note: titles will appear automatically on your student’s Sora home page when the assignment begins and will check back in automatically on the assignment end date.
You can assign a title for up to 180 days.
7) Add an email address for yourself (or the educator on whose behalf you’re creating the Title assignment) so they know when the assignment has begun.
This field is not meant for student email addresses since they will see the assignment appear in Sora automatically.
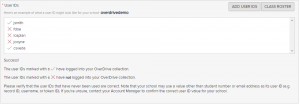
8) On the right-hand side of the page, click to add the user IDs for the student to whom this title will be assigned. It’s important to ensure that these IDs are spelled/formatted correctly so the title is assigned to the right student.
Pro-tip: To make sure you’ve got your IDs correct, they can be copied and pasted from another document, such as a Word or Excel document, or even a plain text editor.
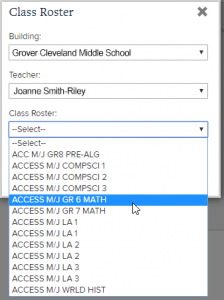
In some schools, rostering capabilities may also be available. Be sure to check with your Account Manager to see if that’s a possibility for your school.
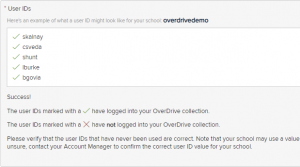
Once your IDs have been input, you may see some IDs with green checkmarks next to them, and some with red Xs. If you have IDs with red Xs, check the spelling/formatting for those student IDs.
If the IDs are correct, it’s likely that those students have simply not yet signed into Sora before.
If at least one green check mark appears AND your student IDs are correct, the Title assignment will fulfill properly, regardless of the red Xs.
Pro-tip: before assigning a title to a class, try a formative assessment where the entire class all logs in to Sora to ensure that everyone knows where and how to do so.
Then, you can be assured that all student IDs will result in a green check mark during the Title assignment process.
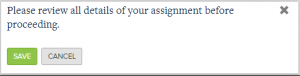
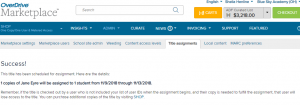
9) Submit and confirm your Title assignment. Once confirmed, you will get a success message at the top of your Marketplace screen.
10) Click Title assignments again to check the calendar view and see your scheduled assignment in the queue. You can choose a view that shows all Title Assignments for your school or limit the view to just Title assignments that you have created under your login.
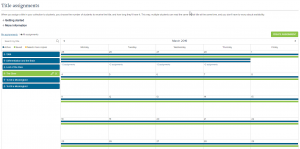
A BLUE assignment means the titles has been assigned and will be checked out on the prescribed date. You may edit or delete a Title assignment at any time before the go-live date.
A GREEN assignment means the Title assignment is live and active and cannot be edited or deleted from this page.
More information and help:
If you are interested in reading more about the Title assignments feature and how it could be used in your classroom, learn more about why Title assignments is the coolest Marketplace feature you’re not yet using.
Alternately, feel free to reach out to your Account Manager for more training, or watch our recorded module about on the OverDrive Resource Center, where we walk you through the process, step by step!
1 Comment
Comments are closed.
[…] account when logged in. For step-by-step instructions on how to use this feature, please see this link. * Please note this feature can only be used with Advantage-owned titles. Consortium-owned […]